How to apply sensitivity labels in Office 365

When working in business there will be times when you need to add sensitivity labels in office 365 to highlight how sensitive your information is, whether this is for internal use on documents, confidential contractual agreements, or something that is in a draft.
Having the ability to highlight the sensitivity of a document not only adds visual identification but helps integrate into more Microsoft 365 to automatically identify and control document use with other features within the Microsoft 365 ecosystem.
Microsoft 365 comes with this feature set built-in, under their compliance section at https://protection.office.com/, however, before you use this, you will need to ensure that you have the Azure Active Directory Premium P2 plan license in place for each user to make use of it.
Creating the labels
To create labels, navigate to the https://protection.office.com/ website and then click on the Classification section and then Sensitivity Labels, this will bring you to the area where you can create all your labels for use with Office.
One thing to bear in mind though, the sensitivity labels in office 365 are based upon order, the first being more important than the second, and so on. But do not fear, you can easily re-order them after creation if needed.
To get started, click on the button ‘Create a label’, this will open up the wizard to create your label.
- Enter a name
- Enter a description that you want to display to your admin staff
- Enter a description you want to display to your remaining staff
Click the Next button
Next up, is whether you want to encrypt the information which is associate with this label, for the purpose of this article, we’re going to say None and ignore this one, but please read up on these features it could be good to automatically encrypt any sensitive information you have in place.
Click the Next button
Next up, is Content marking, do you want the documents to display what you want? For example, displaying a ‘CONFIDENTIAL’ word in your header, or footer? If so, click on the option to enable the marking. This will then give you the option to add wordings to the footer, body, and header of the document.
When you’re done, click the Next button to continue.
Auto labeling for applications is the next option, however, for this article, we’ll ignore it. Click next to continue.
Review your settings and if everything looks good click on the ‘Create label’ button.
Repeat the process for all your labels.
Publishing the ensitivity labels in office 365
Once you are done you need to publish your labels to the Office environment, click on the ‘Public Labels’ button.
Click on the options to choose the labels you would like to publish, then click on the next button to continue.
Select the users or groups you want this to be published to, by default it selects everyone.
Click next to continue.
The next option asks you whether you want to automatically apply the labeling to your documents. For example, you could have CONFIDENTIAL applied to all documents.
Click next to continue.
Name and give your policy a description and click Next.
Review your publish settings and if everything is ok Publish.
Installing the client application
Before your Office applications can use the labels properly you need to ensure that you download and install a client application, this can be found here: https://www.microsoft.com/en-gb/download/details.aspx?id=53018. Once installed you can now use the labels within your apps.
Using the labels
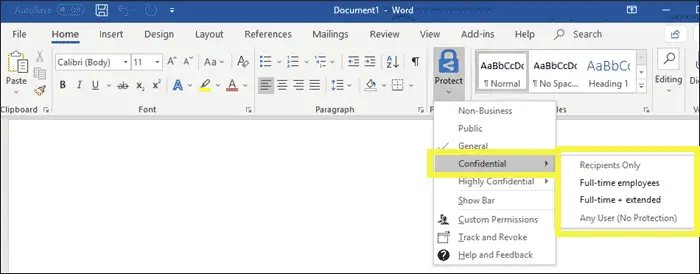
If everything is working as expected you should be able to go into your Office applications and add labels as shown.
References:
- Microsoft 365 Licensing https://docs.microsoft.com/en-us/office365/servicedescriptions/microsoft-365-service-descriptions/microsoft-365-tenantlevel-services-licensing-guidance/microsoft-365-security-compliance-licensing-guidance
- Learn about sensitivity labels – https://docs.microsoft.com/en-us/microsoft-365/compliance/sensitivity-labels?view=o365-worldwide
- Getting started with sensitivity labels – https://docs.microsoft.com/en-us/microsoft-365/compliance/get-started-with-sensitivity-labels?view=o365-worldwide
Lastly, if you haven’t already, you should look at protecting your environment with two-factor authentication. We discuss this here in this article.
